11/14/2023

How to Use PSA Service Box with VXDIAG VCX NANO GM?

 Tutorial: How to set up PSA Service Box SPS programming for Opel/Vauxhall using J2534 passthru device.


The hardest part is creating an account.

You need to purchase the software update from Service Box, a PSA site that now deals with GM products in Europe.

*Opel Vauxhall Vehicles Not available Due to the separation of General Motors and Opel/Vauxhall, ACDelcotds.com does not have any Service information or Programming for Opel/Vauxhall vehicles. Users looking for this information need to visit public.servicebox-parts.com for any and all Opel Vauxhall information.


It does not use your email address as a login, instead it will use a UserID code that will appear in your email shortly after registration… Except, in my case it didn’t and I had to use the reset password link, to get a one time password, which I then updated.


Then register it as a professional and log in OK, once you are in, you can select ‘Purchase Opel/Vauxhall Legacy & Chevrolet Subscription‘, then select the brand. Pick ‘vehicle programming software (SPS)‘, add to the basket (link at the bottom) then proceed through to the checkout.


if come to purchase SPS for 2 hours it requires an active VAT number, ignoring the warning requesting and complete your details by adding the required VAT number, it then carries on OK to payment!

Use PSA Service Box with VXDIAG VCX NANO GM 1

Use PSA Service Box with VXDIAG VCX NANO GM 2

Use PSA Service Box with VXDIAG VCX NANO GM 3

Make sure you have a fully updated windows, that you have internet explorer and the latest version of java installed before you buy the subscription and start the downloads etc. And make sure you have a good internet connection when installing and downloading.

Next step is to get your interface in J2534 passthrough mode. You can use a cheap vxdiag vcx nano gm/opel scanner to do this, but you’ll need to update the firmware using VX MANAGER, and then again use VX MANAGER to put it into passthrough mode.

During installation of the VX Manager make sure you choose only “PASSTHRU – J2534” (1st option) and have the cable plugged in. Then open the program to check if it sees the cable.

The VCXNano can appear like any number of ‘factory’ diagnostic tools. VX MANAGER is used to load the license into the nano to turn it into the required tool, so the factory software (in this case gm gds2) will see it as a factory tool.


Usually when you buy a nano you should buy the one designed for the software you want to use, that way They come pre-licensed.


The SPS procedure is the same as in the ACDelco TDS website.

A lot have finished reprogramming the HPCM2 module to re-set an SHVCS error, using a VXDIAG VCX Nano and Service Box.
Some other J2534 devices that tested working with online service box:
Autel MaxFlash VCI but seems buggy and slow.
Launch j-box 3, which is basically rebranded Drew Technologies CarDAQ-Plus3. Top level devices in pass-thru world.
Quite pricy, but worth any money IMHO.
scanmatik continues not working with diagbox
KTS 590 works well with both PSA and Renault.
Keep updating…

11/08/2023

Free Download Diagbox 9.150 Software

 Peugeot Citroen DS Opel Diagbox 9.150 was tested and approved works perfectly. Obdii365.com here provides software download for free.


Free download Diagbox 9.150

Free download Diagbox 9.150

Already patched. Don’t need activation.

If your system doesn’t have diagbox versions, run 1-Block defender to close anti-virus programs. Then run Diagbox 9.150.exe.

If your system has other diagbox version installed, run 1-Block defender, then run 2-Diagbox_Cleaner to delete other diagbox versions, then run Diagbox 9.15.exe


Software version: Diagbox 9.150, no vmware

Operating system: Windows 10/Windows 11 64bit

Vehicle coverage: Peugeot, Citroen, DS, Opel till 2023

What is the firmware used with this version?

1. Lexia 3 full chip, it will support all Diagbox 9.xx versions. there is no solution for old and Lite Lexia3 VCI

2. VXDIAG VCX SE/VCX DoIP with PSA license

PSA Peugeot Citroen Diagbox License is Ready on VXDIAG!

*VXDIAG is good on 2006- CAN BUS models. For older Kline models, use lexia3.


Multilingual:  English, German, Danish, Spanish, French, Italian, Dutch, Portuguese, Suomi, Swedish, Romanian, Croatian, Hungarian, Czech, Polish, Greek, Slovenian, Polish, Korean, Turkish etc

Diagbox 9.150 language

Diagbox 9.150 software display

Diagbox 9.150 software 1

Diagbox 9.150 software 2

Diagbox 9.150 software 3

Diagbox 9.150 software 4

Diagbox 9.150 software 5

Diagbox 9.150 software 6

Diagbox 9.150 software 7


11/07/2023

VXDIAG VCX SE Update PSA Diagbox License

 Good news! VXDIAG released new PSA Peugeot Citroen DS software for vxdiag diagnostic tools.


Compatible devices:  VXDIAG VCX SEVXDIAG VCX DoIP series


*VXDIAG does not have a single vcx nano for PSA yet.

*Available for VCX SE V94SE****, VCX Multi V52XP****, V71XN****, V81XD****, V83XD****, V94XD*****, VCX PRO P71XP****.

*Must enable PSA license to use diagbox software.


How to Activate PSA License to VXDIAG scanners?


1. Purchase PSA license authorization

https://www.obdii365.com/wholesale/vxdiag-psa-software-license.html

2. Install PSA license in vx manager


VXDIAG VCX SE Update PSA Diagbox 1

3. Update firmware and license in vx manager

VXDIAG VCX SE Update PSA Diagbox 2

4. Install and activate Diagbox software


10/31/2023

Free Download VXDIAG GM GDS2 2023.10 Tech2win DPS

 VXDIAG VCX NANO GM (as well as vcx se, vcx DoIP GM series scanners) latest GDS2 software goes to V2023.10.19 (Oct. 2023).


Free download VXDIAG GM GDS2 V2023.10 software

GDS2 2023.10 + Tech2win + DPS

Software including:

GDS2 2023.10.19

Tech2win

DPS 4.52

(Contact www.obdii365.com customer service to send patch online)

Free Download VXDIAG GM GDS2 2023.10 Tech2win DPS 1

GDS2 Software version:

GM Global: V2023.10.19
GM China: V2023.10.12
Saab V2023.10.05
VINFAST v2021.4.0
Opel/Vauxhall V2023.4.0

Operating system: Win7/Win10

Supports Buick Enclave, Encore, Envista, Cadillac CT4, CT5, Lyriq, XT4, XT5, XT6 etc till year 2024.

VXDIAG GM GDS2 2023.10 software 1

VXDIAG GM GDS2 2023.10 software 2

How to Install VXDIAG GM GDS2 and Tech2win?

1. Install DPS 4.52

2. Install Tech2win using the AutoInstall.exe file
3. Install GDS2 using the AutoInstall.exe file

4. Install VX Manager (install passthru and GDS2/T2W drivers)
5. Run software (run GDS2 from patch, run Tech2win on desktop)
* If you are running Windows 10 you MUST disable driver signing enforcement. For detail installation instruction, check PDF here.


NOTE:

Before installing GDS 2023.10.19 software, must install DPS 4.52 software, otherwise GDS2 will report errors.

1/11/2023

VXDIAG VX Manager, Firmware, License and Driver Update

 Here is the newbie instruction to update VXDIAG VX Manager, Firmware, License and Drivers. The instructions can be applied to all VXDIAG VCX NANO, VCX SE and VCX Plus diagnostic tools.

How to Update VXDIAG VX Manager?

Visit www.vxdiag.net official website and download the latest version vx manager driver.

update vxdiag vx manager

or download here directly

http://www.vxdiag.net/managecenter/download/vxdiag.zip

Here is current version 1.8.9 on Mega as well.

https://mega.nz/file/udohRDTb#xrt4ui1A2yh0GnOWHPmm2jsAdD7PU3G7vcU2K3tCtYA

Then install vx manager.

install vx manager

(Install it on Win7, Win8, Win10. WinXP is not supported).


How to Install and Update VXDIAG Device Driver?

Connect vcx nano/vcx se or vcx plus with laptop via USB cable

Go to the Diagnostic tab in vx manager.
Make sure your Passthru and corresponding device driver are installed.

update vxdiag vx manager device driver 0

If not installed, press icon and “Install” it.

If there is a purple icon of the driver which means there is a new software version update that needs newer driver support.
Press the corresponding driver and Update driver.

update vxdiag vx manager device driver 1

update vxdiag vx manager device driver 2

How to Update VXDIAG Scanner Firmware?

After installing latest vx manager, connect press Firmware upgrade

update vxdiag firmware
Check if there is a new VCI update, Press Yes to update
If it is DoIP device, update both VCI and DoIP firmware.

update vxdiag doip vci

How to Update VXDIAG License?
Press “Update License”

update vxdiag licese

NOTE: Always update firmware first, then update license afterwards.

Check when your license will expire in “Licenses” tab.

Vxdiag license should be renewed every 60 days starting from year 2021.

Renew license requires update vxdiag vci firmware as well.

vxdiag license

Some Common errors and solutions about vx manager firmware, license and diver:

1). If vx manager has error  “Updated license failed! Retry. ErrorCode:8001”

vxdiag vx manager error code 8001

Make sure you have updated both VCI and DoIP firmware.

Then update firmware and license again. Sometimes need to update firmware and license for several times to set it up.


2). No device in vx manager

vxdiag no device

1. Please check if the vx manager is newest v1.8.9 version. If not, please uninstall old version, then download new version from www.vxdiag.net. Install the new version vx manager to try again.

2. If still no device, please change USB port or USB cable to try.

3. Disconnect device from laptop and car, after 3 minutes, connect again.

4. Please open Network connection on control panel, find Ethernet (Realtek USB FE Family Controller), check the IP address is correct. Correct IP should be 192.168.171.1 or 192.168.8.1.If IP is not correct, need to reset firmware.


3). Error : “The device license for this application is invalid or expired ” when install device driver.

The device license for this application is invalid

VX Manager manager is too old. Update to latest version and try again.


4).  License invalid, please update VCI.

Solution: The error is usually caused by missing license. Check available license in “Licenses” area
If cannot see your license, contact your dealer to add license to your vcx se.


5). Not Found Device or License.

Solution: It is driver problem Update firmware in vx manager.

Then re-install devicedriver.


6).  Update license Failed. Error 4001
There was an error communicating with the server.

Solution: Always update the firmware first, then update license.

7/04/2022

Free Download V126 VXDIAG VCX NANO Ford IDS

 Both Ford and Mazda IDS V126 has been tested and verofiied working no issue on July 2022.


Software version:

Ford IDS V126.01

Mazda IDS V126.01


Operating system: Win7, Win8 and Win10

Attention: Mazda and ford ids must be installed on different operative systems. On the same computer but on different windows(dual boot) only. Or on different computers


Device affected: vxdiag vcx nano ford/mazda USB/WiFi version, VXDIAG VCX SE Pro, VXDIAG Full, Ford VCM2 clone using vx manager etc


Free download Ford IDS V126

https://mega.nz/folder/6dwzgaJR#XW2q1xPdbgKV4XtZQqkB0w

File including:

IDS-126.01_full.exe
VCI_Software_1.0.0.10.exe VX Driver
VX Manager 1.8.9.0601.exe

Free download Mazda IDS V126

https://mega.nz/folder/iQp1UACZ#d4ey2cWHmaEMf9n2dTcTAQ

File including:

IDS-126.01_full.exe
VX Manager 1.8.9.0601.exe

Free download Ford and Mazda IDS Patch

https://mega.nz/folder/OV4RRC6B#seCWP6UCzOPWEDYlQxZ1iQ

** INSTALLATION GUIDE WITH EASY STEPS INCLUDED **


Ford IDS native install languages: Chinese (traditional, simplified), Czech, Danish, Dutch, English, Finnish, French, German, Greek, Hungarian,

Italian, Japanese, Norwegian, Polish, Portuguese, Romanian, Russian, Slovenian, Spanish, Swedish, Thai, Turkish


Ford IDS Installation:

1. Install Ford IDS-1**
2. Wait for the installation of Ford IDS – 1**, and restart the computer
3. Install the Ford original VCI software_ 1.0.0.10.exe
4. Install VX manager and Ford IDS driver
5. Wait for VX manager and Ford IDS driver installation to complete
6. Connect VCX device and install idspatch
7. Use idspatch to open IDs and start diagnosis.


Mazda IDS Installation:

1. Install mazdaids-1**
2. Wait for mazdaids – 1** installation to complete and restart the computer
3. Install VX manager and Ford IDS driver
4. Wait for VX manager and Ford IDS driver installation to complete
5. Connect VCX device and install idspatch
6. Use idspatch to open IDs and start diagnosis.

2/18/2022

How to Use VXDIAG VCX NANO with ForScan, FJDS, FDRS?

 Vxdiag vcx nano for Ford/Mazda has been tested as a good j2534 passthru interface. VCX NANO works perfectly with IDS, ForScan, FJDS and FDRS as a J2534 pass-through device.

IDS (Ford Integrated Diagnostic System) allows dealership technicians to diagnose and service Ford, Lincoln, Mercury vehicles. As the new diagnostic tool, IDS will be required to perform diagnostics on future model year vehicles.

FJDS ( Ford J2534 Diagnostic Software) is the new version of Ford Module Programming, and the interface is clunky like IDS. FJDS does not have the same level of diagnostics as IDS but if you need to program modules, change some parameters, etc

FDRS (Ford Diagnostic & Repair System) is the official dealer diagnostic and repair software used by technicians at your dealership. It can test (run diagnostics) on various modules, update module software, load/reload as-built configurations etc.

ForScan is mostly used for module configuration (it cannot do module software updates).

  • Set up VXDIAG with Ford IDS
  • Set up VXDIAG with Ford ForScan
  • Set up VXDIAG with Ford FJDS/ FDRS

Set up VXDIAG VCX NANO with Ford IDS

The latest version IDS for VXDIAG goes to V124 (till Feb, 2022)

Free Download VXDIAG Ford IDS V124

https://mega.nz/folder/6dwzgaJR#XW2q1xPdbgKV4XtZQqkB0w

Including
FordIDS-124.01_full.exe
VCI_Software_1.0.0.10.exe
VCI Manager (Ford) 20.11.24.exe

Ford IDS V124 Installation Instruction 

1. Install IDS Software
2. Install VCI_Software_1.0.0.10
3. Install VCI Manager(Ford) 20.11.24

Install Ford IDS-124
Wait for the installation of Ford IDS – 124.01, and restart the computer
Install the Ford original VCI software_ 1.0.0.10.exe
Install VX manager and Ford IDS driver
Wait for VX manager and Ford VCI driver installation to complete
Connect VCX device and install idspatch
Use idspatch to open IDs and start diagnosis.


How to set up and install VXDIAG Ford IDS on Windows 10?


Set up VXDIAG VCX NANO with Ford ForScan

This is how to set FORScan to detect and work with Vxdiag Vcx Nano for Ford.

First of all install VX Manager and this passthru driver:

Set up VXDIAG VCX NANO with Ford ForScan 1

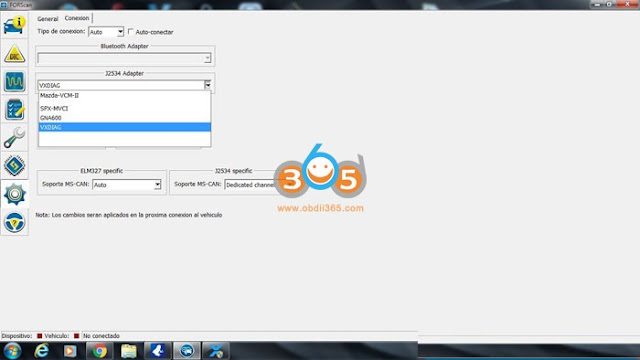
And second configure ForScan how this image:

Better run Forscan as administrator and select J2534 adapter as VXDIAG

Set up VXDIAG VCX NANO with Ford ForScan 2
It’s run perfectly

Update the VCX manager and drivers to the latest version.


Set up VXDIAG VCX NANO with Ford FJDS/FDRS

Here is the procedure with FDRS. FJDS is very similar, just use different license. Make you you have the required FJDS license from Motorcraft.

Tools you will need:

– Windows PC with 4GB RAM or greater, running Windows 10 natively (Macs running Windows bootcamp or other VM based solutions are known to cause issues)
– VXDIAG VCX Nano Ford interface
– USB Flash drive 64GB or larger (must be formatted to exFAT)
– 12V Automotive Battery Charger/Maintainer (can be purchased from Amazon)

Software you will need:

– VX Manager (installs driver for your VXDIAG VCX Nano device)
– Ford Diagnostic & Repair Software (commonly known as FDRS)

Software installation (step-by-step):

1) Download the latest VX Manager installer from here
2) Start VX Manager installation, when prompted select PASSTHROUGH – J2534

Set up VXDIAG VCX NANO with Ford FDRS 1

DO NOT SELECT FORD/MAZDA – IDS. Using this IDS emulation can brick your ECU during the update process (learned the hard way)

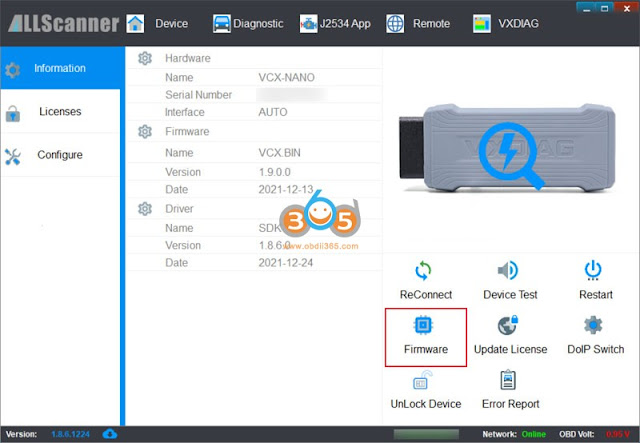
3) Connect VCX Nano Ford device to your PC using the supplied USB cable and launch VX Manager. The tool should recognize the device. If there is a device firmware available, update the device firmware


Set up VXDIAG VCX NANO with Ford FDRS 2

4) Download and install FDRS software from here. You will need a license to run this software and can be purchased here (2-day FDRS license cost $50)
5) Launch FDRS, you will be prompted to enter the license that you have just purchased. Login using your credentials created on Motorcraft website. Make sure you select Non-Dealer Motorcraft as User Type

Set up VXDIAG VCX NANO with Ford FDRS 3

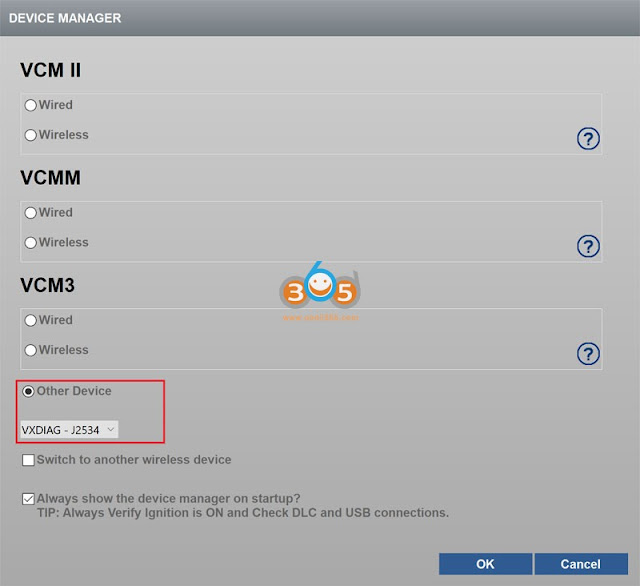
6) Connect your VXC Nano Scanner to your truck’s ODBII port and connect the USB cable to the PC running FDRS. Once FDRS Device Manager pops up, make sure you select Other Device, in the drop-down dialog select VXDIAG – J2534.

Set up VXDIAG VCX NANO with Ford FDRS 4

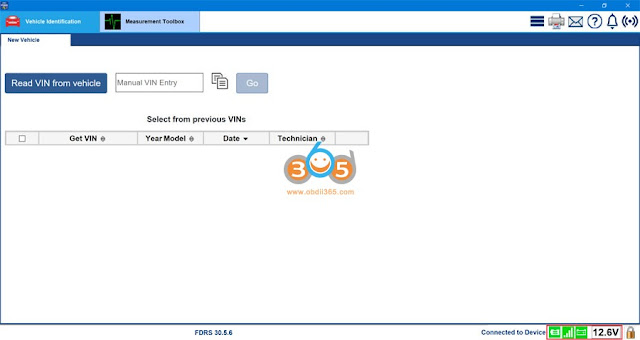
After this you should be greeted with this screen, meaning you are ready to go!

The icons at the bottom should be all green with battery voltage shown

Set up VXDIAG VCX NANO with Ford FDRS 5

Running Network Test (Intial Scan)

1) Turn Ignition On, Engine Off
2) Click Read VIN from vehicle
3) Click Go to initiate Network Scan

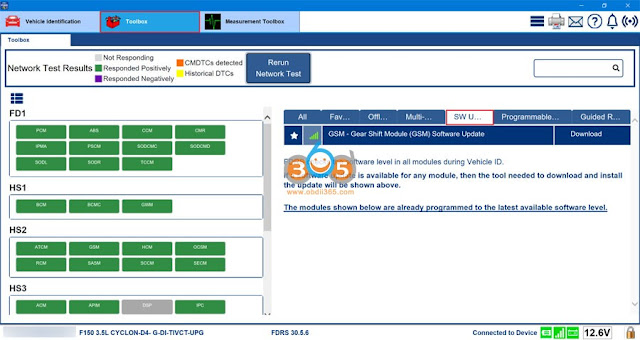
Once completed a new tab called Toolbox will appear at the top of your FDRS screen:

Set up VXDIAG VCX NANO with Ford FDRS 6


On the left hand side you will see all modules detected on your truck. The ones that responded positively will be marked green. On the right hand side notice the SW Updates tab. Head over here to see all available SW updates for your modules.

http://blog.obdii365.com/2022/02/18/set-up-vxdiag-vcx-nano-for-ford-ids-forscan-and-fdrs/#3