7/07/2020

How to Activate EPC WIS for vxdiag Benz?

Confirmed: vxdiag Benz c6 multi tool EPC & WIS require activation before using.  please activate EPC WIS by following the parts.
vxdiag-benz-c6
Video Guide

Open “Xentry License”, then click on “OK”.

Open “WIS-EPC”, user: admin, password: 12345 (copy from “WIS-EPC User” notepad).
activate-vxdiag-benz-epc-wis-1

Click on “Server” then “Edit the access authorization”.
activate-vxdiag-benz-epc-wis-2

Copy “Lan-ID”. Then open “Computer” -> Local disk (C:) -> WIS, paste the LAN-ID, input number of users (253) and expiration date (2/26/2032), then “Generate”;
activate-vxdiag-benz-epc-wis-3

Copy EPCnet and paste it to EPC StartKey.
activate-vxdiag-benz-epc-wis-4

activate-vxdiag-benz-epc-wis-5
Copy “WISnet” and paste it to WIS/ASRA StartKey.
Click on “Save”.
activate-vxdiag-benz-epc-wis-6

activate-vxdiag-benz-epc-wis-7
Click on “Programs”, then “EPC”.
Note: please click on “Cancel” to cancel the program re-start.
activate-vxdiag-benz-epc-wis-8

Select “Option” then “Setup F2”.
activate-vxdiag-benz-epc-wis-9

Reset the language as English.
activate-vxdiag-benz-epc-wis-10

activate-vxdiag-benz-epc-wis-11
Exit EPC.

Back to “Programs”, then “WIS/ASRA”.
Click on “Run”, then “Cancel”
activate-vxdiag-benz-epc-wis-12

Select “Option” then “Setup F2”, then reset the language you want.
activate-vxdiag-benz-epc-wis-13

Exit WIS/ASRA.

Now ready to use EPC and WIS/ASRA normally with vxdiag Benz c6 scanner.

Related video:
How to activate and use VXDIAG Multi Tool Xentry DAS?

6/17/2020

VXDIAG Toyota Techstream V15.00.026 Download and Installation

VXDIAG Toyota TIS Techstream V15.00.026 software & patch free download, install and crack guide are provided here for free.


Version: V15.00.026
Software language: Chinese, English, French, Italian, Spanish, German etc
Operating system: Windows 7 or above

Free download VXDIAG Toyota Techstream V15.00.026 Software
Free Download VXDIAG Toyota Techstream Patch
Note: The software and patch are applied to vxdiag scan tools. It is not tested on Mini vci j2534 cable. You are at your risk.


How to install VXDIAG Toyota Techstream V15.00.026?
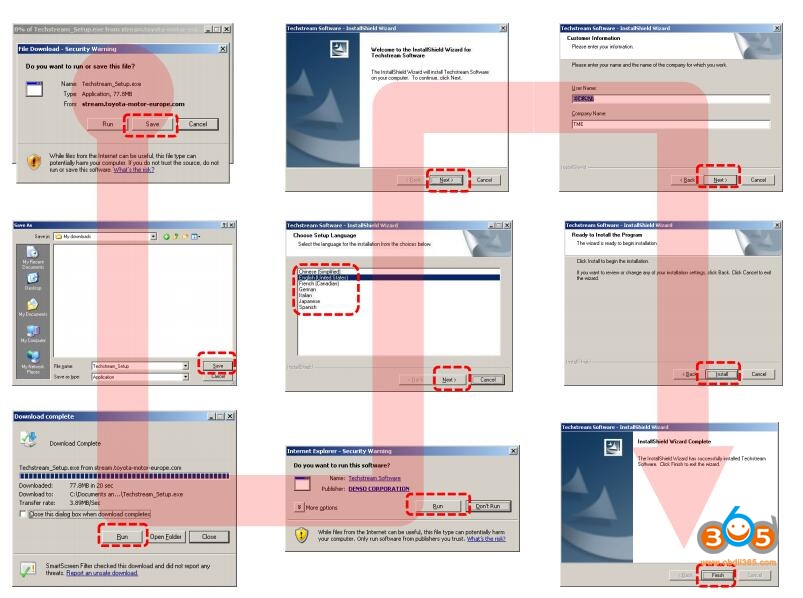
Step 1: Install Techstream setup
install-techstream-v15-00-026-for-vxdiag-1
Run Techstream_Setup _V15.00.026
install-techstream-v15-00-026-for-vxdiag-2

Select setup language
install-techstream-v15-00-026-for-vxdiag-3

Install InstallShield wizard for Techstream
Accept license agreement
install-techstream-v15-00-026-for-vxdiag-4

Enter User Name: AADD and company name: 1
Press Install
install-techstream-v15-00-026-for-vxdiag-5

Install wizard completed. Press Finish.
install-techstream-v15-00-026-for-vxdiag-6

Install .NET Framework 4.7.2, accept license agreement, press Install
If prompt Framework 4.7.2 setup failed, just close the program to ignore
install-techstream-v15-00-026-for-vxdiag-7

install-techstream-v15-00-026-for-vxdiag-8

Open TechstreamPatch folder, copy and paste Toyota Launcher to  C://Program Files/Toyota Diagnostics/Techstream/bin folder

Step 2: Install VX Manager
Connect vxdiag vcx nano interface with laptop
Windows doesn’t see detect driver, you have to install VX Manager driver first
Run VX Manager on desktop
install-techstream-v15-00-026-for-vxdiag-9

Select Toyota Techstream software to install
Install VX Manager driver success
install-techstream-v15-00-026-for-vxdiag-10

Windows will detect device driver and USB Port (COM4)
install-techstream-v15-00-026-for-vxdiag-11

Run VX Manager to check device information

Step 3: Crack Techstream V15
install-techstream-v15-00-026-for-vxdiag-12
Go to C://Program Files/Toyota Diagnostics/Techstream/bin, open Toyota Launcher
install-techstream-v15-00-026-for-vxdiag-13

Select area: Other, press Next
install-techstream-v15-00-026-for-vxdiag-14

Select software language, press Next
install-techstream-v15-00-026-for-vxdiag-15

Complete Techstream configuration dealer information
Press OK

Step 4: Run Software
Run Techstream V15.00.026 software
install-techstream-v15-00-026-for-vxdiag-16

Connect to vehicle
install-techstream-v15-00-026-for-vxdiag-17

select vehicle information
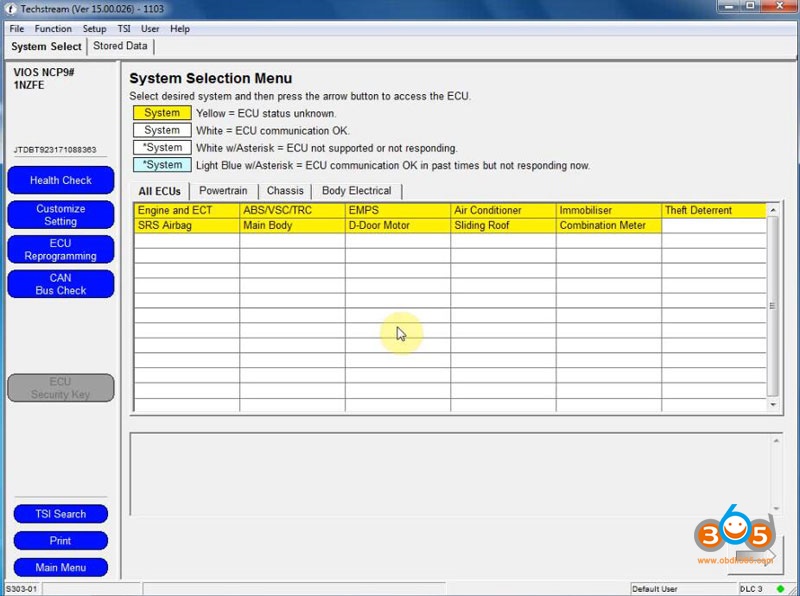
Now you can diagnose, do Health Check, Customize setting, ECU reprogramming, CAN Bus check etc with the tis techstream v15
install-techstream-v15-00-026-for-vxdiag-18

install-techstream-v15-00-026-for-vxdiag-19

11/11/2019

Free Download Toyota Techstream 14.30.023

Free download Techstream 14.30.023 dealer software for obd2 diagnosis and programming on Toyota, Lexus, Scion:

Release Date: 2019/11
Version: 14.30.023
techstream-v14-30-023
Multilingual (without Russian):
Chinese, English, French, Italian, Spanish, German, etc.
System requirements: Windows XP-10 x32 and x64
Minimum PC requirements
Supported OSWindows XP SP2Windows Vista 32 bit (64 bit not supported)Windows 7 – 32 bit
Main memory512MB1GB1GB
Display resolutionRecommended: 1024×768 – Minimum: 1024×600
Available Hard Disk Space256MB
Processor speed1 GHZ
USB1 USB 1.1 or 2.0 port free
NetworkInternet Connection required for software activation


Techstream activation: pls go to the thread http://garageforum.org/Thread-TS-All-Ver…on?page=98


Techstream software installation:
instruction:
install-techstream-v14
video:

VERY VERY VERY IMPORTANT:

If you cannot get Techstream activated and make it go, it’s your way to go:
Techstream inside the kit is confirmed to work well for Toyota customization, obd2 diagnosis and programming.

TIS is available in three different levels. The link above (VXDIAG VCX NANO Techstream) has the full functionality.

Subscription Level FeaturesTechstream StandardTechstream Professional
Diagnostic
Techstream Security
Professional
TIS Library
Service BulletinsYesYesYes
Repair ManualsYesYesYes
Wiring DiagramsYesYesYes
Technical TrainingYesYesYes
Other Technical InformationYesYes
Diagnostics / Reprogramming
Techstream Scantool SoftwareYesYes
ECU CalibrationsYesYes
Identifix Direct-HitYesYes
Security
(U.S. and Mexico VINs only)
Key CodesYes
Immobilizer / Smart ResetYes
* Mini VCI J2534 cable remain untested. You are at you risk.

8/22/2019

Anyone use VXDIAG VCX Nano GDS2 for GM?

Let me start with why I wanted this, BTW… worth every penny!!!
Ok, so I had a 4.0+ amp draw since I purchased the car, problem is I thought it was intermittent issue, 2nd issue was once the voltage dropped below the threshold the amp draw would disappear… in the end it was reproducible after 3 on then off, then lock, key cycles. ended up being the MSM memory seat module (aka seat control module) well the dealer wanted time to program it for $90. Since I already replaced it, I was tired of paying the stealerships for 5 mins of coding. New MSM’s are blank and require programming, hence the need for this tool, nothing comes close as for cost and end result.
Now on to the good news, new MSM installed and coded and working great and no amp draw, also playing around I found other control modules that needed to be updated,
some things I saw available as well like – After blower option for our HVAC. Looks like we might be able to update to add a rear camera if we have the factory parts.
I even updated my Magneride suspension F55, radio, HVAC, Drive door control module, some others had updates available.
GM MDI GDS2 programming….
vxdiag-vcx-nano-gds2-1

vxdiag-vcx-nano-gds2-2

vxdiag-vcx-nano-gds2-3

vxdiag-vcx-nano-gds2-4

vxdiag-vcx-nano-gds2-5

vxdiag-vcx-nano-gds2-6
Tech2Win DIAG….
vxdiag-vcx-nano-gds2-7

vxdiag-vcx-nano-gds2-8

USB Drivers, and software setup was a little bit of a PITA, its not exactly a straight forward install, and no instructions other than some youtube videos.

Software (tech 2) & MDI config is free with the tool on obdii365.com for about $110, then if you want to program modules you get 1 VIN for 24 months/2 years unlimited for that 1 VIN for $40, so $160. I was able to get it to work on Windows 10 64bit. took some work to get all the Java updated, windows defender off, firewall off, update the scanners firmware, install passthru & GDS2, from VXDIG allscanner site’s website and go through all the GM stuff if you decide to update via the GDS2
If you just want a Tech 2 its comes with the VXDIAG, you access GDS2 programming its via GM’s acdelcotds site to install that software, there’s not a lot of documentation.

The CD that came with my interface only had tech 2 & MDI software, and VMplayer to run GDS2 for 30 days, I am still trying to figure stuff out.
Which version do you have wifi or usb? also try downloading the new VX manager from all scanners website (Chinese everywhere but you will see it towards the bottom), then update the VX interfaces drivers I believe as of writing this is 1.5xxx, (VX manager was buggy, I had to restart the application a few times and reboot once) from the VX manager of the left make sure to install pass-thru & GDS2/T2W drivers, I was not able to connect at all without all the drivers installed of this completed correctly.
Getting the SPS working took a lot of Java updates and requiring me to turn off windows defender and firewall rules, also on GM’s site, you may purchase their version of the emulation software for tech 2 which is $275 (1x time fee) which I skipped on. I only pulled fault codes and looked at some tech 2 stuff but seemed ok, also did you have a battery charger on when you where bleeding? key on engine off eats power, as a former MB tech we always hooked up the battery charger anytime the SDS (MB’s tool) was connected. I will try playing around with the tech 2 some more I need to bleed the brakes on my 2016 Sierra.
I mostly used this for programming via SPS, best part is it will work for 2008-2017 GM vehicles for programing which for me and my entire family works perfect!
GDS2 as it is global diag systems, only seems to work for most new vehicles like 2012 CTS since we are on a CTSV site, otherwise Tech 2 is the diag… tool used for most vehicles which would include abs bleed function.


In short, its worth every penny, you can use tech 2 to view and diag BCM, HVAC, issues, BOSE issues, etc…. HP Tuners is cool but having GM dealership diag and programming at home priceless.


6/24/2019

V2018.10 VXDIAG Subaru SSM3 Software Installation

Latest V2018.10 Subaru SSM3 software has been tested and working no issue with VXDIAG VCX Plus WiFi interface. Here obdii365.com provides installation guide of VXDIAG VCX PLUS Subaru SSM3(Subaru Select Monitor III) step-by-step.

Software version: SSM 3 V2018.10
Operating system: Windows XP/Windows 7
Language:English German Spanish French Italian
Supported Subaru year: 2005 to 2018
Internet connections:  Yes

VXDIAG SUBARU SSM3 Software Function:
1. All System Diagnosis.
2. Each System Check.
3. Saved Data Display.
4. Immobilizer (register key)
5. Reprogram.
6. Read CF application measurement data.
7. Convert/Save measurement data on driving recorder.
8. Oscilloscope.
9. Program Subaru smart key

Main steps:
Step 1: Install SSM3 setup
Step 2:Install SSM4 setup
Step 3: Install FlashWrite
Step 4: Install VX Manager driver

Disclaimer: You should install SSM4 setup to finish installation. But VXDIAG scanner is not compatible with SSM4 software.  Do always use SSM3 software only.

Procedure:
install-2018-10-vxdiag-subaru-ssm3-1
Open SSM_201810 software CD
install-2018-10-vxdiag-subaru-ssm3-2

Select “Subaru Select Monitor III” Install
Accept license agreement
install-2018-10-vxdiag-subaru-ssm3-3

Install diagnosis software setup
PC application installation success
install-2018-10-vxdiag-subaru-ssm3-4
Select “Subaru Select Monitor 4” to install
install-2018-10-vxdiag-subaru-ssm3-5

Install Wizard for SSM4
Accept license agreement
install-2018-10-vxdiag-subaru-ssm3-6

Press Install
install-2018-10-vxdiag-subaru-ssm3-7

The InstallShield Wizard has successfully installed Subaru Select Monitor 4
install-2018-10-vxdiag-subaru-ssm3-8

Select “FlashWrite2” Install
install-2018-10-vxdiag-subaru-ssm3-9

Press Next to install
Accept license agreement
Press Install
install-2018-10-vxdiag-subaru-ssm3-10

Installed FlashWrite2 success
install-2018-10-vxdiag-subaru-ssm3-11

Select “Driver” install
Accept license agreement
Remove device when installing
install-2018-10-vxdiag-subaru-ssm3-12

Select to install Subaru VX Manager driver
install-2018-10-vxdiag-subaru-ssm3-13
install-2018-10-vxdiag-subaru-ssm3-14

Install Subaru SSM VCX Driver completed
install-2018-10-vxdiag-subaru-ssm3-15

Quit Install Menu
Run Subaru Select Monitor III software on desktop
install-2018-10-vxdiag-subaru-ssm3-16
Go to Tool tab->Option to do select language you desired
install-2018-10-vxdiag-subaru-ssm3-17
V2018.10 VXDIAG Subaru diagnostic software is ready to use.