Showing posts with label vxdiag vcx nano for toyota. Show all posts

3/12/2024

Register Toyota Prius 2015 TPMS with VXDIAG Techstream

 How-to: register Toyota Prius 2015 TPMS tire pressure sensors with Techstream.


You will need a Techstream cable that has TPMS capability, for example, the vxdiag vcx nano Toyota or the genuine Mongoose Pro MFC cable.

You also need proper Techstream software. Some versions may not have a Utility option. Here use V18.00.008 with autokent keygen activation (google it).

MINI VCI or the MVCI Pro cable don’t do TPMS.


Background information:

We installed a winter set of wheels, but we don’t know the ID of the “winter” sensors. We only know the “summer” ones, and only because the summer set a year ago had to be disassembled and a winter makeshift set put on them. The burning TMPS (Tire Monitor Pressure System) icon on the instrument panel is also a little annoying.

So we need to register the TPMS sensor.


First of all, hook up the Autel TS508WF TPMS scanner.

The scanner is cool, it shows all the information at once at the end: where is which ID, pressure, temperature and battery status.

Register Toyota Prius 2015 TPMS with VXDIAG Techstream 1

Purchase 4 sets of TPMS sensors. Now the received sensors need to be registered in the car. We take the techstream cable and laptop under our arms and stomp to the parking lot. Let’s launch Techstream and get into TMPS.


1.From a bunch of modules, select the Tire Pressure Monitor we need.

Register Toyota Prius 2015 TPMS with VXDIAG Techstream 2

2. In the Trouble Codes section, as expected, we see 4 errors due to lack of communication with sensors.

Register Toyota Prius 2015 TPMS with VXDIAG Techstream 3

3. In the Data List section we see that Main Tire has (?) 4 slots and 2nd Tire also has 4 slots. The temperature is -40 in each… undetectable sensor, and the pressure everywhere is N/A kPa

Register Toyota Prius 2015 TPMS with VXDIAG Techstream 4

4. In the Utility section, run ID Registration to begin the procedure for registering sensors

Register Toyota Prius 2015 TPMS with VXDIAG Techstream 5

5. We read that the process will fail if you started it when the machine is only in the process of identifying sensors (if you just turned it on) and if you exceed 5 minutes to enter all IDs

Register Toyota Prius 2015 TPMS with VXDIAG Techstream 6

6. Consistently enter all 4 IDs known to us
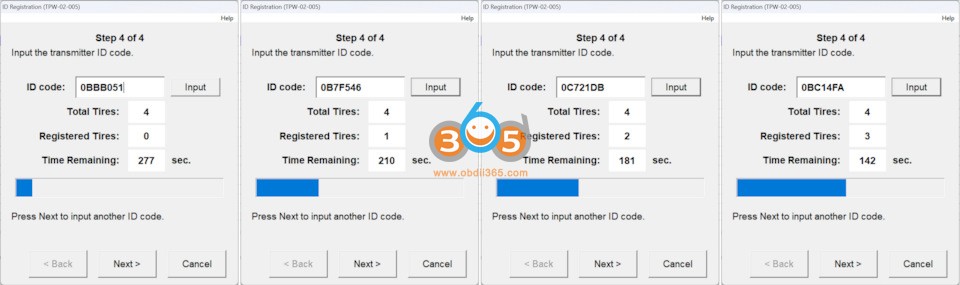
Register Toyota Prius 2015 TPMS with VXDIAG Techstream 7

7. After the process is completed, within a few minutes you will be able to watch in real time how the machine polls sensors in the background and displays temperature and pressure on the monitor (in this screenshot only one sensor was picked up, and the error on the right in the Number of DTC still hangs)

Register Toyota Prius 2015 TPMS with VXDIAG Techstream 8

8. And here all the sensors have already picked up and the error on the right has disappeared. At the same moment, the TPMS icon on the dashboard should go out.

Register Toyota Prius 2015 TPMS with VXDIAG Techstream 9

Done.


http://blog.obdii365.com/2024/03/13/how-to-register-toyota-prius-tpms-with-techstream/

6/17/2020

VXDIAG Toyota Techstream V15.00.026 Download and Installation

VXDIAG Toyota TIS Techstream V15.00.026 software & patch free download, install and crack guide are provided here for free.


Version: V15.00.026
Software language: Chinese, English, French, Italian, Spanish, German etc
Operating system: Windows 7 or above

Free download VXDIAG Toyota Techstream V15.00.026 Software
Free Download VXDIAG Toyota Techstream Patch
Note: The software and patch are applied to vxdiag scan tools. It is not tested on Mini vci j2534 cable. You are at your risk.


How to install VXDIAG Toyota Techstream V15.00.026?
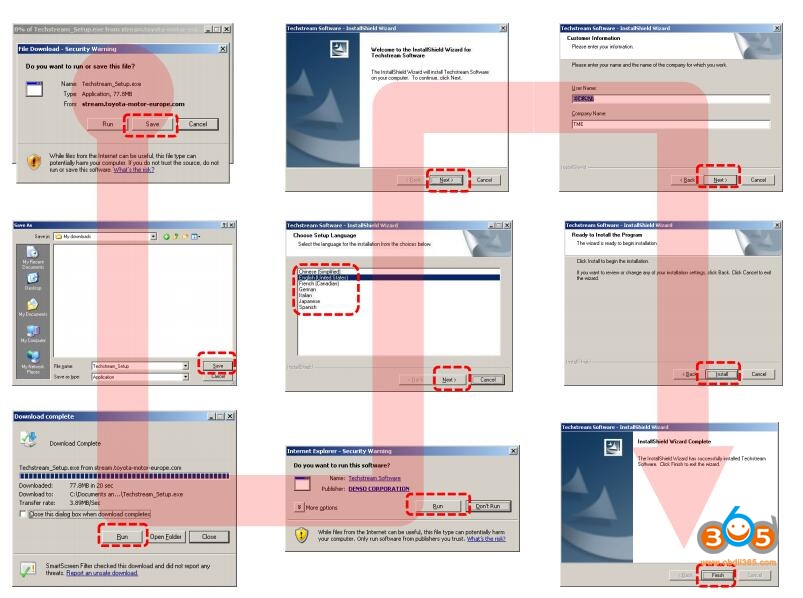
Step 1: Install Techstream setup
install-techstream-v15-00-026-for-vxdiag-1
Run Techstream_Setup _V15.00.026
install-techstream-v15-00-026-for-vxdiag-2

Select setup language
install-techstream-v15-00-026-for-vxdiag-3

Install InstallShield wizard for Techstream
Accept license agreement
install-techstream-v15-00-026-for-vxdiag-4

Enter User Name: AADD and company name: 1
Press Install
install-techstream-v15-00-026-for-vxdiag-5

Install wizard completed. Press Finish.
install-techstream-v15-00-026-for-vxdiag-6

Install .NET Framework 4.7.2, accept license agreement, press Install
If prompt Framework 4.7.2 setup failed, just close the program to ignore
install-techstream-v15-00-026-for-vxdiag-7

install-techstream-v15-00-026-for-vxdiag-8

Open TechstreamPatch folder, copy and paste Toyota Launcher to  C://Program Files/Toyota Diagnostics/Techstream/bin folder

Step 2: Install VX Manager
Connect vxdiag vcx nano interface with laptop
Windows doesn’t see detect driver, you have to install VX Manager driver first
Run VX Manager on desktop
install-techstream-v15-00-026-for-vxdiag-9

Select Toyota Techstream software to install
Install VX Manager driver success
install-techstream-v15-00-026-for-vxdiag-10

Windows will detect device driver and USB Port (COM4)
install-techstream-v15-00-026-for-vxdiag-11

Run VX Manager to check device information

Step 3: Crack Techstream V15
install-techstream-v15-00-026-for-vxdiag-12
Go to C://Program Files/Toyota Diagnostics/Techstream/bin, open Toyota Launcher
install-techstream-v15-00-026-for-vxdiag-13

Select area: Other, press Next
install-techstream-v15-00-026-for-vxdiag-14

Select software language, press Next
install-techstream-v15-00-026-for-vxdiag-15

Complete Techstream configuration dealer information
Press OK

Step 4: Run Software
Run Techstream V15.00.026 software
install-techstream-v15-00-026-for-vxdiag-16

Connect to vehicle
install-techstream-v15-00-026-for-vxdiag-17

select vehicle information
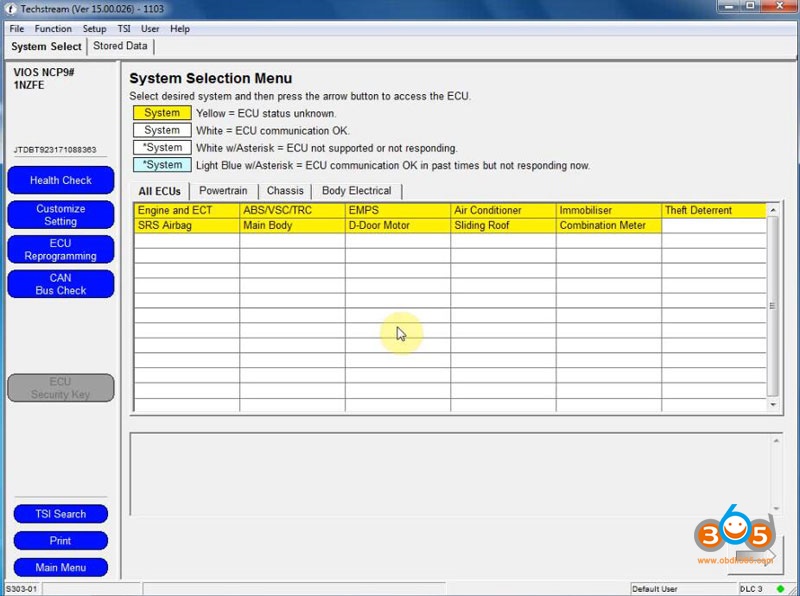
Now you can diagnose, do Health Check, Customize setting, ECU reprogramming, CAN Bus check etc with the tis techstream v15
install-techstream-v15-00-026-for-vxdiag-18

install-techstream-v15-00-026-for-vxdiag-19

11/11/2019

Free Download Toyota Techstream 14.30.023

Free download Techstream 14.30.023 dealer software for obd2 diagnosis and programming on Toyota, Lexus, Scion:

Release Date: 2019/11
Version: 14.30.023
techstream-v14-30-023
Multilingual (without Russian):
Chinese, English, French, Italian, Spanish, German, etc.
System requirements: Windows XP-10 x32 and x64
Minimum PC requirements
Supported OSWindows XP SP2Windows Vista 32 bit (64 bit not supported)Windows 7 – 32 bit
Main memory512MB1GB1GB
Display resolutionRecommended: 1024×768 – Minimum: 1024×600
Available Hard Disk Space256MB
Processor speed1 GHZ
USB1 USB 1.1 or 2.0 port free
NetworkInternet Connection required for software activation


Techstream activation: pls go to the thread http://garageforum.org/Thread-TS-All-Ver…on?page=98


Techstream software installation:
instruction:
install-techstream-v14
video:

VERY VERY VERY IMPORTANT:

If you cannot get Techstream activated and make it go, it’s your way to go:
Techstream inside the kit is confirmed to work well for Toyota customization, obd2 diagnosis and programming.

TIS is available in three different levels. The link above (VXDIAG VCX NANO Techstream) has the full functionality.

Subscription Level FeaturesTechstream StandardTechstream Professional
Diagnostic
Techstream Security
Professional
TIS Library
Service BulletinsYesYesYes
Repair ManualsYesYesYes
Wiring DiagramsYesYesYes
Technical TrainingYesYesYes
Other Technical InformationYesYes
Diagnostics / Reprogramming
Techstream Scantool SoftwareYesYes
ECU CalibrationsYesYes
Identifix Direct-HitYesYes
Security
(U.S. and Mexico VINs only)
Key CodesYes
Immobilizer / Smart ResetYes
* Mini VCI J2534 cable remain untested. You are at you risk.

4/01/2019

VXDIAG Toyota Techstream V14.00.018 and Patch Free Download

VXDIAG scanners Toyota Techstream software V14.00.018 (02/2019) has been tested and verified working no issue. V14 software supports Toyota diagnosis till 2019.


Free Download VXDIAG Toyota Techstream V14.00.018
Free Download VXDIAG Toyota Techstream V14 patch
techstream-v14-00-018
Year: 02/2019
Version: V14.00.018
Operating system: WINDOWS 7/8/8.1/10 x32/x64
Region: All regions.
Language: English, Spanish, Chinese, German,French etc
Compatible devices: all VXDIAG scanners, VXDIAG VCX NANO ToyotaVCX ProVCX PLUS and VXDIAG Full
(The software does not test with other devices, mini vci, mangoose cable etc)


TIS techstream
TIS techstream is the replacement for the Diagnostic Tester. It combines the functionality of TIS and the scantool into a single portable device. With TIS techstream, technicians can simultaneously view/analyze on-board vehicle data, browse relevant TIS service documents, and reprogram vehicles all from the driver’s seat via wireless connection to TIS.
Scantool Diagnostics
TIS techstream offers full support for 1989 current vehicles marketed in the United States. Periodic software updates will be available to support new models. TIS techstream provides quick and easy access to all available systems on the vehicle as well as a one touch vehicle status report (Health Check).

Activation and installation:
No need registration key.  Install techstream software then run the patch.
Similar procedure as Ford IDS native installation. 

12/03/2017

Toyota Techstream 12.30.017 Software Free on Mega

(12/2017) Free download TOYOTA TIS Techstream V12.30.017 software and install on Windows 7 or Windows 10, to get it work with Techstream cables like Mini vci j2534 cable, Vxdiag vcx nano for toyota diagnostic tool, etc. 
toyota- techstream 12.30.017
 TOYOTA TIS Techstream V12.30.017 download free:
Ver: 12.30.017
Password: Not required!
Security: Unknown

TOYOTA Techstream V12.30.017 activation:

Credits to Autokent

Toyota Techstream 12.20.024 crack download with security:
It’s crack version. No need activation
Tested OK with Mini VCI cables (SV46, SV46-B), Mangoose VCI (SV46-C) and Vxdiag Vcx Nano for Toyota

Techstream install windows 7:
Step 1: install Toyota Techstream 12.20.024 software

open Techstream 12.20.024 disk F:
copy all files to another new folder on Desktop
open Techstream 12.20.024 setup application
choose a setup language for installation
preparing setup
Next to install Techstream software
accept the agreement
enter the user name and company name, then Next
begin Techstream 12.20.024 installation
installing Techstream 12.20.024…
successfully installed Techstream
Finish Techstream v12 installation


Step 2: replace the MainMenu.exe

copy the MainMenu.exe
go to Techstream Properties on Desktop
open file location
paste and replace MainMenu.exe in Program files/toyota diagnostics/techstream/bin


Step 3: install MVCI driver

run MVCI driver for TOYOTA TIS SETUP
Next to install MVCI driver
Install
installing MVCI driver
Finish MVCI driver installation


Step 4: register Techstream

run Techstream application on Desktop
Yes to continue
close the internet explorer
this is Toyota Techstream ver.12.20.024 interface
register Techstream software 12.20.024
it’s Techstream crack version
use key (attached to the Instructions.txt) to register
OK
exit Techstream


Step 5: check MVCI fw version

run MVCI firmware update tool on Desktop
exit MVCI firmware update tool


Step 6: run Techtsream 12.20.024
run Techstream application on Desktop for use


Techstream install windows 10:

This is a how-to’s of TechStream10.10.018 on my Windows 10 64-bit tablet. Here are the steps:

  1. Installed TechStream software

  1. Extracted XHorse install package into temporary directory, e.g. in command shell msiexec /a “MVCI Driver for TOYOTA.msi” /qb TARGETDIR=<destination path>
Where destination path = path to temporary directory

  1. Copied contents of extract to C:\Program Files (x86)\XHorse Electronics\MCVI Driver for Toyota TIS\

  1. Downloaded and installed the 64-bit registry hack (contents below – save text to file and name file with .reg extension, run to install via RegEdit)

Windows Registry Editor Version 5.00:

[HKEY_LOCAL_MACHINE\SOFTWARE\Wow6432Node\PassThruSu pport.04.04]

[HKEY_LOCAL_MACHINE\SOFTWARE\Wow6432Node\PassThruSu pport.04.04\XHorse – MVCI]
“Name”=”XHorse – MVCI”
“Vendor”=”XHorse ELECTRONICS Co.,Ltd.”
“ConfigApplication”=”C:\\Program Files (x86)\\XHorse Electronics\\MVCI Driver for TOYOTA TIS\\FirmwareUpdateTool.exe”
“FunctionLibrary”=”C:\\Program Files (x86)\\XHorse Electronics\\MVCI Driver for TOYOTA TIS\\MVCI32.dll”
“APIVersion”=”04.04”
“ProductVersion”=”1.1.0”
“ProtocolsSupported”=”J1850VPW:1, J1850PWM:1, CAN:1, ISO9141:1, ISO14230:1, ISO15765:1”
“J1850VPW”=dword:00000001
“J1850PWM”=dword:00000001
“ISO9141″=dword:00000001
“ISO14230″=dword:00000001
“CAN”=dword:00000001
“ISO15765″=dword:00000001
“SCI_A_ENGINE”=dword:00000000
“SCI_A_TRANS”=dword:00000000
“SCI_B_ENGINE”=dword:00000000
“SCI_B_TRANS”=dword:00000000

  1. Rebooted tablet
  2. Plugged in J2534 Mini-VCI cable. Windows 10 automatically detects the cable. You will notice in device manager it adds 3 devices:

Ports (COM & LPT) -> USB Serial Port (COM<n>) where <n> = a system assigned number
Universal Serial Bus Controllers -> USB Serial Converter
Vehicle Interface Module

Interestingly enough, Windows 10 installs the most up to date drivers for these devices. I tried to manually install the MVCI drivers from the MSI, no avail – on reboot, Windows 10 overwrites these.
Anyways, I don’t think manually updating the drivers is necessary with the registry hack.
  1. Loaded TechStream
  2. In the menu, go to Setup -> VIM Select -> select Interface Setup = XHorse – MVCI
  3. Turn vehicle to ON, position II
  4. Select ‘Connect to Vehicle’ and you should be able to connect!