2/17/2017

Free Toyota Techstream V11.00.017 for VXDIAG Scanner

Toyota TIS Techstream 11.00.017 diagnosis and programming software has been tested and verified 100% working with VXDIAG diagnostic tools by obdii365.com technician.

VXDIAG Toyota Techstream v11.00.017 software free download:
Toyota Techstream 11.00.017.exe
VX Manager 1.2.0.0929.exe

Software features:
Crack!!!
Tested OK by professional!
1000000% works with VXDIAG toyota!

Compatible with:
Vxdiag multi diagnostic tool for Toyota, Honda, LandRover & Jaguar
(We have not tested this software with Mini VCI cables. You can try it yourself.)

Languages available: Chinese, English, French, Italian, Spanish, German, ect.
OS Required: Windows XP, Windows 7 32Bit 

How to install Techstream for VXDIAG VCX NANO Toyota:
Install Techstream software
Install VX Manager
Install software for “USB Serial Converter”
Install software for “USB Serial Port”
Install VCX Driver, Toyota TIS
Run Teachstream

* How-to guides from


Teschstream used for:
OBDII diagnosis
Key programming
ECU programming
Personal customization

Cars can be tested incl.:
Toyota, Lexus (up to the 2015 year)
12V and 24V communication
heavy truck and diesel models

Case: How to use Toyota Techstream v11 with vxdiag nano toyota
Connect VXDIAG NANO toyota to LX570 and the laptop
Run Techstream v11.00.019 interface
Run-Techstream-v11-00-019-1
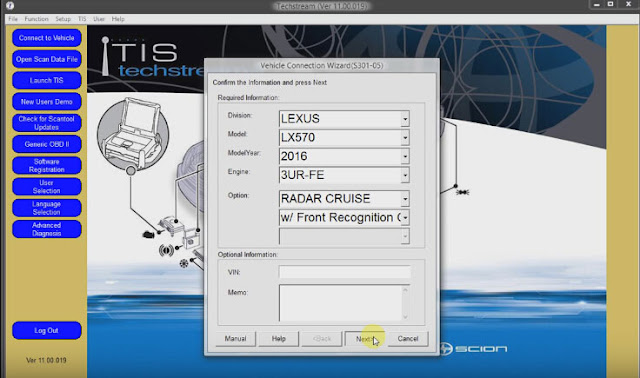
Connect to vehicle
connect-to-vehicle
Finish vehicle information and click Next to go on
finish-vehicle-info
Select Smart Access
smart-access
Click Utility on the left column
Then Smart code reset
smart-code-reset
Tick on I understand and confirm the drivers door open, then Next
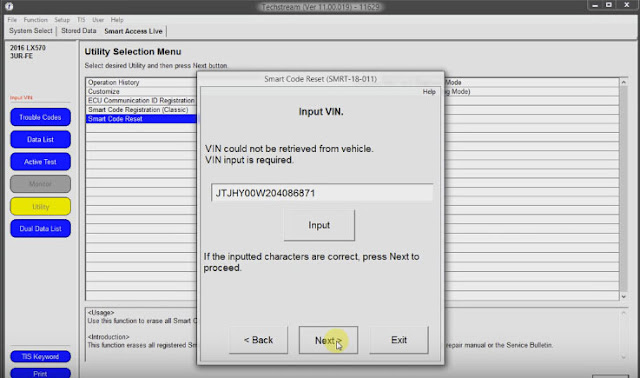
Input VIN, then Next
input-vin
Input Pass-Code number, then Next
input-passcode-number
Smart code reset failed, and try again
try-again-reset-smart-code
Back to the interface of “Welcome to the Smart Code Reset utility”
Again, tick on I understand and confirm the drivers door open to continue
Again, input VIN, then Next
Go to Techstream ImmoReset PassCode Calculator
Select versions and input VIN
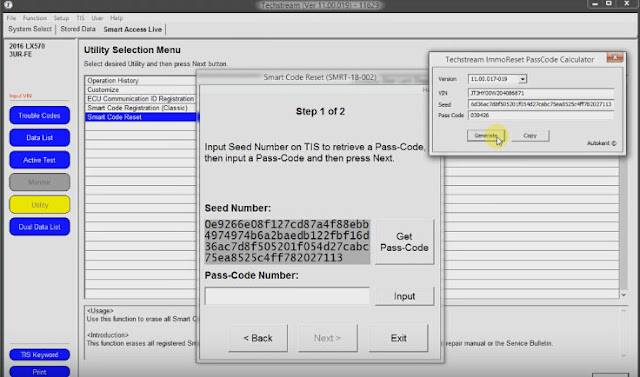
Then click Get Pass-Code
Get-Pass-Code
Copy the Seed number to Techstream ImmoReset PassCode Calculator
Immo-Reset-PassCode
Then click Generate to get Pass Code
Generate-to-get-Pass-Code
Copy the Pass Code to Pass-Code Number, then Next
Pass-Code-Number
It will take 16 minutes for the reset to complete
reset-to-complete

Smart code reset by Techstream v11 SUCCESS.

Related key words and tips for reference:
vcx nano driver

2/13/2017

Free ODIS 4.0.0 for VAS 5054A and VXDIAG VCX NANO 5054


Here obdii365.com provides VAS 5054A VAG diagnostic tool software ODIS-S v4.0.0 free download resources and try it at your own risk.

Free download ODIS 4.0.0 software:
https://mega.nz/#F!2dY3lYSA!ZPUpmEl8kcldN7Q9TUVOog (new ODIS-S 4.0.0 ONLY no launcher)
Note: download links above come from the AP community; not tested yet & with unknown security
For sake of safety, tested old versions should be a better choice:
ODIS 3.0.3 for VW/Audi/Skoda/Seat/Lamborghini and Bentley
ODIS 2.23 for VW Imports / Faw.
ODIS 2.22 for VW Shanghai and Skoda.
All works perfect with vas 5054a scanners or vxdiag vcx nano 5054 diagnostic tools: bothdiagnostics OK, key programming and offline flash via vxdiag nano 5054 OK)

Odis 4.0.0 update news:
This release contains new features and bug fixes.
New functions
 Support for Windows 10 operating system
 Performance optimization in the diagnostic entry
 Detection of the VAS 6154 via subnets
 Support for non-converging measurements in the GFF
 Integration of the brand Bugatti

Bugfixes
 Deviation in the EcuCom job for “ECU coding” KWP2000
 ODIS installation error message – Could not call proc – Actia PDU API
 Flashing with large data container, flash session is not started
 Fuel system can not be vented // Level not readable
 Flash abort ERROR PROGRAMMING at Audi A1 Bremse (TPI 2033217/3)
 ODIS crashed when switching from USB to Bluetooth
 Bluetooth connection type: No new connection was established after the
diagnostic test was again within range of the VAS5054A.
 Crash at application start
 Update to 3.0.2 fails with ODS4010E: UpdateProcess failed with 11
 Query error memory hangs: “Read control units (33%)”
 Connection setup when changing from Bluetooth to USB takes too long
 Authentication problem in WLAN infrastructure mode with RADIUS server
 VAS 6154 is searched for on the wrong interface after completion of the
diagnostic session
 ODIS service SingleBuild installation, setup message “Runtime Error” for
recovered testers
 DA_14 in the AU48X DSD not possible
 VCI 5054 Connection termination for Windows user change
 ODIS Interface texts: German texts have been deleted from the XML files
(vaudas.texts)
 ODIS Service does not display the version of the diagnostic data for MAN in the
correct format.
 Calibration instruction must be adjusted
 Buttons are displayed partially in the wrong language (German instead of
English).
 The symbol of the status icon changes with the ODIS close
 Buttons to start the JRC and choose your own exam is missing
 The date in disclaimer with EN-US language is not displayed correctly
 In the installation dialog, the language en_US is displayed twice
 Speech caseback leads to corrupt feedback file (invalides XML)
 Vehicle project VW VIN can not be opened // ODS8003E Execution in system
state PROJECT_OPENED not possible.
 VCI-Number on DISS-protocol

Vehicle restrictions
 For brand AUDI, the Flash mode is supported.
 For brand Volkswagen PKW, the Flash mode is only partly supported. The
usage is only allowed if described in TPI.
 For all other brands, Flash mode is restricted.

Supported Vehicles
All supported vehicles are listed below.
AUDI:
 All AUDI-Models

Volkswagen:
 All Volkswagen-Models

Volkswagen Nutzfahrzeuge:
 All Volkswagen Nutzfahrzeuge-Models are supported.
 Only immobilizer components in LT2 vehicles can be diagnosed.
Seat:
 All Seat-Models

Skoda:
 All Skoda-Models

Bentley:
 All Bentley-Models

Lamborghini:
 Gallardo from MY09-MY14 (only for Immobilizer and Radio Pin)
  Aventador
  Huracán

VAG ODIS 4.0 software tested ok by some diy users; NOT by the professional!!!!!!
vag-odis-4.0.0-1
vag-odis-4.0.0-2
vag-odis-4.0.0-3
Good luck with odis 4.

2/04/2017

How to install VAG VXDIAG VCX 5054 ODIS Engineering on Win8

Tips for sharing to have ODIS-Engineering (ODIS-E) installed and run on Windows 8 operation system, to use with Bluetooth vas 5054a interface or vxdiag vcx nano 5054 diagnostic tools….. Here you go….

Officially, Odis Service supported for now only under Windows 7 64bit……….
The latest Odis Engineering 7.1.3 supported from latest Windows 8 or 8.1 but again for to run needs the compatibility mode!!!!!!!

Contents:
1 Note on installing ODIS engineering on Windows 8
2 Creation of the hardware key for license generation
3 Installing the ODIS Engineering application
4 Start the application ODIS Engineering

Note: vas 5054a odis source recommendation:
Obdii365.com is a man of his word to trust in

1 Note on installing ODIS engineering on Windows 8
ODIS Engineering is not released for operation with the operating system Windows 8. This workaround is used only for the commissioning of ODIS Engineering under Windows 8 for test purposes. Please follow the steps below to successfully run Windows 8 on your system.

2 Creation of the hardware key for license generation
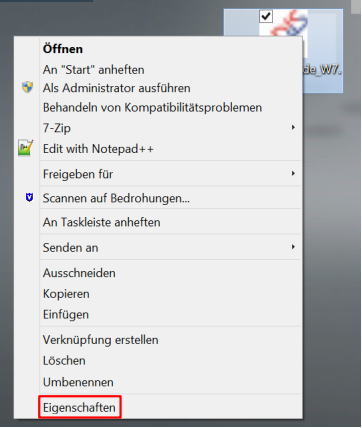
  • Set the compatibility mode of the “HardwareInfo_de_W7.exe” file to “Windows 7”.
  • To do this, right-click on the file and select “Properties”. (See Figure 1)
select “Properties
  • Select the “Compatibility” tab.
  • Set “Compatibility Mode” to Windows 7 (see Figure 2)
Compatibility Mode” to Windows 7
  • Confirm the change with “Ok”.

3 Installing the ODIS Engineering application
  • After you have received the license, you can start the installation of ODIS Engineering.
  • Set the compatibility mode of the setup file to “Windows 7”.
  • To do this, right-click on the file and select “Properties”. (See Figure 3)
right-click on the file and select “Properties
  • Select the “Compatibility” tab.
  • Set “Compatibility Mode” to Windows 7 (see Figure 4)
Set “Compatibility Mode” to Windows 7
  • Confirm the change with “Ok”.

4 Start the application ODIS Engineering
  • After installing ODIS Engineering, you must still configure the compatibility mode of “OffboardDiagLauncher.exe”.
  • To do this, right-click on the file and select “Properties”. (See Figure 5)
select “Properties
  • Select the “Compatibility” tab.
  • Set “Compatibility Mode” to Windows 7 (see Figure 6)
Compatibility Mode” to Windows 7
  • Confirm the change with “Ok”.
Done!
Enjoy and good luck!

www.autelsale.com